
Wicket + MyBatis + Guice (+ Maven)でおk
世の中には様々な言語とフレームワーク(FW)があるので、Webアプリケーションと言ってもその作り方は百通り以上あると思います。今回はJava使いの自分が「多分このやり方が一番楽だろう」という方法を書いて行きます。
タイトルと似たような記事は既に存在して、例えば以下のようなものがあります。
けど、微妙に情報が古かったりして少し手間取ったので自分でやってみた結果をここに書いておきます。
Wicket
JavaでWebアプリケーションを作るときに、個人的に一番厄介だと思うのがMVCでいうVです。Vは大抵JSPで書かれます。なまじJavaが書けちゃうもんだから、そこにめっさ処理を記述する場合があります。「そんなことないよ、あくまで表示のための処理だけを書くんだよ」と分かっていても、コーダが自分じゃないことはよくあるし、そしてM,Cの設計が残念な場合、Vもそれにつられて残念になることがあります。HTMLとJavaでごっちゃになってて見づらかったり、IDEの支援がフルに受けられなかったりもするし・・・。
というわけでVにHTMLがそのまま使えるWicketを採用します。
Wicketを知らない人は以下のWicket公式HelloWorldを見ればいいと思います。wicket:id=""をHTMLに書いて、後はJavaのWebPageを継承したクラスで対応するものを埋め込むだけです。
http://wicket.apache.org/learn/examples/helloworld.html
簡単だし、見やすいし、何よりHTMLをHTMLとして見れるのが良いです。JSPみたいに変に混ざってない。そんな訳でWicketを採用します。
MVCのM,CとMyBatis
VはWicketでやることにしましたが、M,Cはどうすればよいのか・・・。個人的にはMもCも確かに重要だけど、普通にJavaのコード書くだけでOKな気がしています。FWの支援はそこまでいらないのでは?と。
しかし、最低限、使う場所が多くて似たようなコードが多くなるDB処理とDBに依存するMは何とかしたい!そこで当たり前ともいえるO/Rマッパーを利用します。これにはMyBatisを採用します。
Hibernateも確かに便利だと思うけど、いかんせんSQLが見えないと怖いし学習コストも高い。そんな訳でMyBatisを採用します。
MyBatisはHibernateと比べてテーブル間の結合のサポートがないけど、そこは別にDBのVIEW(ストアドクエリ)で大丈夫です。DBとJavaのオブジェクトの同期化もないけど、それは別にいらないような気がしています。普通にMyBatisでupdateなり、deleteなりすればいいし、Hibernateのcommitよりはエンジニアにやさしい気がします。だってupdateとかいうメソッドの方が可読性高いでしょ、きっと。
Guice
なくてもいいけど、あると少し便利です。少しコードの記述が減ります。@Transactionalで例外発生したら自動rollbackとかも便利です。
Maven
慣れたり、概要把握に1週間くらいかかると思うけど、なかなか良いツールです。
使いたいjarがあったらMaven Centralで検索してヒットしたdependencyをpom.xmlに書いてプロジェクト更新。そうすればコード上でjarが利用できるようになります。
別にこれだけならjarを普通にDLしてlibフォルダなりに入れておけばそれでもOKだけど、その場合jarはプロジェクト配下に存在することになって個人的には微妙。gitなりsvnにjarも配置されてしまってサイズが大きくなってしまいます。
コード
前置きはほどほどにしてタイトルに挙げたものを使って簡単なWebアプリを作ります。
要件
- ページはTopPageの1ページのみ
- ページにアクセスすると自分のIPと1つ前の過去にアクセスした日時を表示する
- DBに自分のIPアドレスと現在のアクセス日時を記録する
前提
- Pleiades (All in One Eclipse)
- MyBatis Generator Plugin
- ERMaster Plugin
2と3はオプションだけど、おすすめPluginなのであったほうが良いです。
Eclipseプロジェクト作成
Mavenプロジェクトを新規作成します。
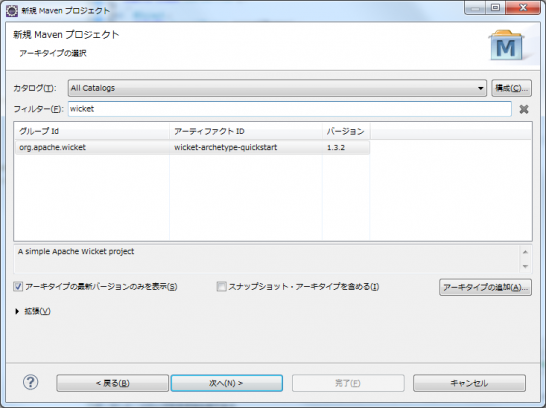
wicket-archtype-quickstartを選択します。しかし、quickstartのバージョンが古いので、カタログを取り込むことにします。
[ウインドウ] -> [設定] -> [Maven] -> [リモート・カタログの追加]で「http://repo1.maven.org/maven2/archetype-catalog.xml」を追加。以下が参考になります。これでquickstartのverが6.10.0になりました。
http://tak-shimiz.lolipop.jp/oyajinote/blog/archives/2011/1115_191057.html
DB作成
DBなどをMySQLに作成します。
mysql -u root -p
create database WicketMyBatisGuice;
create user sample;
grant all privileges on WicketMyBatisGuice.* to sample@"%" identified by 'hoge';
テーブルはERMasterで作成します。もちろん手で書いたり、他のツールを使っても良いです。
CREATE TABLE ACCESS
(
    IP VARCHAR(39) NOT NULL,
    ACCESS_TIME DATETIME,
    PRIMARY KEY (IP)
);
Maven追記
pomを変更。一部不要な記述を消して、今回利用するjarを追記します。
<?xml version="1.0" encoding="UTF-8"?>
<!-- Licensed to the Apache Software Foundation (ASF) under one or more contributor license agreements. See the NOTICE file distributed with this work
  for additional information regarding copyright ownership. The ASF licenses this file to You under the Apache License, Version 2.0 (the "License"); you
  may not use this file except in compliance with the License. You may obtain a copy of the License at http://www.apache.org/licenses/LICENSE-2.0 Unless
  required by applicable law or agreed to in writing, software distributed under the License is distributed on an "AS IS" BASIS, WITHOUT WARRANTIES OR CONDITIONS
  OF ANY KIND, either express or implied. See the License for the specific language governing permissions and limitations under the License. -->
<project xmlns="http://maven.apache.org/POM/4.0.0" xmlns:xsi="http://www.w3.org/2001/XMLSchema-instance" xsi:schemaLocation="http://maven.apache.org/POM/4.0.0 http://maven.apache.org/maven-v4_0_0.xsd">

  <modelVersion>4.0.0</modelVersion>
  <groupId>com.tsukaby.wicket_mybatis_guice</groupId>
  <artifactId>WicketMyBatisGuice</artifactId>
  <packaging>war</packaging>
  <version>1.0.0</version>
  <name>WicketMyBatisGuice</name>
  <description></description>

  <licenses>
    <license>
      <name>The Apache Software License, Version 2.0</name>
      <url>http://www.apache.org/licenses/LICENSE-2.0.txt</url>
      <distribution>repo</distribution>
    </license>
  </licenses>
  <properties>
    <wicket.version>6.10.0</wicket.version>
    <jetty.version>7.6.3.v20120416</jetty.version>
    <project.build.sourceEncoding>UTF-8</project.build.sourceEncoding>
  </properties>
  <dependencies>
    <!-- WICKET DEPENDENCIES -->
    <dependency>
      <groupId>org.apache.wicket</groupId>
      <artifactId>wicket-core</artifactId>
      <version>${wicket.version}</version>
    </dependency>

    <!-- LOGGING DEPENDENCIES - LOG4J -->
    <dependency>
      <groupId>org.slf4j</groupId>
      <artifactId>slf4j-log4j12</artifactId>
      <version>1.6.4</version>
    </dependency>
    <dependency>
      <groupId>log4j</groupId>
      <artifactId>log4j</artifactId>
      <version>1.2.16</version>
    </dependency>

    <!-- MyBatis -->
    <dependency>
      <groupId>org.mybatis</groupId>
      <artifactId>mybatis</artifactId>
      <version>3.2.2</version>
    </dependency>

    <!-- MyBatisGuice -->
    <!-- MyBatisとGuiceを連携させてInjectを利用可能にする -->
    <dependency>
      <groupId>org.mybatis</groupId>
      <artifactId>mybatis-guice</artifactId>
      <version>3.4</version>
    </dependency>

    <!-- WicketとGuice連携用 -->
    <dependency>
      <groupId>com.google.inject</groupId>
      <artifactId>guice</artifactId>
      <version>3.0</version>
    </dependency>
    <dependency>
      <groupId>com.google.inject.extensions</groupId>
      <artifactId>guice-servlet</artifactId>
      <version>3.0</version>
      <type>jar</type>
    </dependency>
    <dependency>
      <groupId>org.apache.wicket</groupId>
      <artifactId>wicket-guice</artifactId>
      <version>${wicket.version}</version>
      <type>jar</type>
    </dependency>

    <dependency>
      <groupId>mysql</groupId>
      <artifactId>mysql-connector-java</artifactId>
      <version>5.1.26</version>
    </dependency>

    <dependency>
      <groupId>javax.servlet</groupId>
      <artifactId>servlet-api</artifactId>
      <version>2.5</version>
      <scope>provided</scope>
    </dependency>

  </dependencies>
  <build>
    <resources>
      <resource>
        <filtering>false</filtering>
        <directory>src/main/resources</directory>
      </resource>
      <resource>
        <filtering>false</filtering>
        <directory>src/main/java</directory>
        <includes>
          <include>**</include>
        </includes>
        <excludes>
          <exclude>**/*.java</exclude>
        </excludes>
      </resource>
    </resources>
    <testResources>
      <testResource>
        <filtering>false</filtering>
        <directory>src/test/resources</directory>
      </testResource>
      <testResource>
        <filtering>false</filtering>
        <directory>src/test/java</directory>
        <includes>
          <include>**</include>
        </includes>
        <excludes>
          <exclude>**/*.java</exclude>
        </excludes>
      </testResource>
    </testResources>
    <plugins>
      <plugin>
        <inherited>true</inherited>
        <groupId>org.apache.maven.plugins</groupId>
        <artifactId>maven-compiler-plugin</artifactId>
        <version>2.5.1</version>
        <configuration>
          <source>1.6</source>
          <target>1.6</target>
          <encoding>UTF-8</encoding>
          <showWarnings>true</showWarnings>
          <showDeprecation>true</showDeprecation>
        </configuration>
      </plugin>
      <plugin>
        <groupId>org.apache.maven.plugins</groupId>
        <artifactId>maven-eclipse-plugin</artifactId>
        <version>2.9</version>
        <configuration>
          <downloadSources>true</downloadSources>
        </configuration>
      </plugin>
    </plugins>
  </build>

  <repositories>
    <repository>
      <id>Apache Nexus</id>
      <url>https://repository.apache.org/content/repositories/snapshots/</url>
      <releases>
        <enabled>false</enabled>
      </releases>
      <snapshots>
        <enabled>true</enabled>
      </snapshots>
    </repository>
  </repositories>
</project>
MyBatis準備
プロジェクトのルートフォルダにgeneratorConfig.xmlを作成します。もちろんmysql-connectorのパスやDBパスワードは適宜変更します。
<?xml version="1.0" encoding="UTF-8" ?>
<!DOCTYPE generatorConfiguration PUBLIC "-//mybatis.org//DTD MyBatis Generator Configuration 1.0//EN" "http://mybatis.org/dtd/mybatis-generator-config_1_0.dtd" >
<generatorConfiguration >
  <classPathEntry location="C:\Users\hoge\.m2\repository\mysql\mysql-connector-java\5.1.26\mysql-connector-java-5.1.26.jar"/>
  <context id="context1" >
    <jdbcConnection driverClass="com.mysql.jdbc.Driver" connectionURL="jdbc:mysql://hoge.com:3306/WicketMyBatisGuice" userId="sample" password="hoge" />

    <!-- エンティティ作成先 -->
    <javaModelGenerator targetPackage="com.tsukaby.wicket_mybatis_guice.bean" targetProject="WicketMyBatisGuice/src/main/java" />

    <!-- MapperXML作成先 -->
    <sqlMapGenerator targetPackage="com.tsukaby.wicket_mybatis_guice.mapper" targetProject="WicketMyBatisGuice/src/main/resources" />

    <!-- Mapperインタフェース作成先 -->
    <javaClientGenerator targetPackage="com.tsukaby.wicket_mybatis_guice.mapper" targetProject="WicketMyBatisGuice/src/main/java" type="XMLMAPPER" />
    <table tableName="ACCESS" />
  </context>
</generatorConfiguration>
これを実行すると以下ができます。これだけでDBに関するエンティティはもうOKです。
- Access.java JavaBeanパターンのエンティティ。DTO。ようするにただのデータ構造でDBのレコード。
- AccessMapper.java DAO。インタフェース。これに対応する実装クラスは生成されないが、問題無し。XMLを見ればよい。今回はこのインタフェースにGuiceで実装クラスのインスタンスを注入し、DB操作を可能にする。
- AccessMapper.xml SQL。AccessMapperの実装。既にいくつかSQLが記述されている。足りない場合は自分で記述するが、今回はしない。
- AccessExample.java AccessMapperに食わせる引数のクラス。SQLで言うWHERE句の検索条件など。
resourcesフォルダにmybatis-config.xmlを作成します。
<?xml version="1.0" encoding="UTF-8" ?>
<!DOCTYPE configuration
  PUBLIC "-//mybatis.org//DTD Config 3.0//EN"
  "http://mybatis.org/dtd/mybatis-3-config.dtd">
<configuration>
  <properties resource="database.properties" />
  <settings>
    <setting name="logImpl" value="LOG4J" />
  </settings>
  <environments default="development">
    <environment id="development">
      <transactionManager type="JDBC"/>
      <dataSource type="POOLED">
        <property name="driver" value="${driver}"/>
        <property name="url" value="${url}"/>
        <property name="username" value="${username}"/>
        <property name="password" value="${password}"/>
      </dataSource>
    </environment>
  </environments>
  <mappers>
    <package name="com.tsukaby.wicket_mybatis_guice.mapper"/>
  </mappers>
</configuration>
database.propertiesを作成して、上記のDB設定を記述します。
driver=com.mysql.jdbc.Driver
url=jdbc:mysql://hoge.com:3306/WicketMyBatisGuice
username=sample
password=hoge
Guice, MyBatis連携
現状のままだと、GuiceはMyBatisを知らないので、MyBatisのオブジェクトを注入しようとしてもできません。(@Injectとか使えない)
なので、こういうときはGuiceの設定を行います。
WicketApplication.javaのinitを以下のように変更。
  /**
   * @see org.apache.wicket.Application#init()
   */
  @Override
  public void init() {
    super.init();

    getComponentInstantiationListeners().add(new GuiceComponentInjector(this, new XMLMyBatisModule() {
      @Override
      protected void initialize() {
        setEnvironmentId("development");
        setClassPathResource("mybatis-config.xml");
      }
    }));

  }
WebPageとService作成
準備が整ったので、今回の目的のページと機能を作成します。まずはページから。com.tsukaby.wicket_mybatis_guiceにTopPageを作成します。
<!DOCTYPE html>
<html xmlns:wicket="http://wicket.apache.org" lang="ja">
<head>
<meta charset="UTF-8">
<title>TOP PAGE</title>
</head>
<body>
  <span>あなたのIP:</span>
  <span wicket:id="ip">ip</span>
  <span>前回のアクセス日時</span>
  <span wicket:id="access"></span>
</body>
</html>
package com.tsukaby.wicket_mybatis_guice;

import org.apache.wicket.markup.html.WebPage;
import org.apache.wicket.markup.html.basic.Label;

public class TopPage extends WebPage {
  private static final long serialVersionUID = 1L;

  public TopPage() {
    Label ip = new Label("ip", "IP");
    add(ip);
    Label access = new Label("access", "ACCESS");
    add(access);
  }
}
WicketApplication#getHomePageも変更しておきます。今回作成したTopPageをホームとします。
  /**
   * @see org.apache.wicket.Application#getHomePage()
   */
  @Override
  public Class<? extends WebPage> getHomePage() {
    return HomePage.class;
  }
これだけでも動きますが、画面上に「あなたのIP: IP 前回のアクセス日時 ACCESS」と表示されるだけで全く意味がないです。そこで、次にIPとACCESSの部分を取得するロジック部分を作成します。
ここからMyBatisとGuiceに登場してもらいます。
まずAccessService.javaを作成します。Objectが継承元の普通のクラス。
package com.tsukaby.wicket_mybatis_guice;

import java.util.Date;

import org.mybatis.guice.transactional.Transactional;

import com.google.inject.Inject;
import com.tsukaby.wicket_mybatis_guice.bean.Access;
import com.tsukaby.wicket_mybatis_guice.mapper.AccessMapper;

public class AccessService {

  @Inject
  private AccessMapper accessMapper;

  @Transactional
  public void writeAccess(String ip) {

    Access record = new Access();
    record.setIp(ip);
    record.setAccessTime(new Date());

    Access exist = accessMapper.selectByPrimaryKey(ip);
    if (exist == null) {
      accessMapper.insert(record);
    } else {
      accessMapper.updateByPrimaryKey(record);
    }

  }

  @Transactional
  public Access readAccess(String ip) {
    return accessMapper.selectByPrimaryKey(ip);
  }

}
次にこれをTopPageの方で利用するように変更します。
package com.tsukaby.wicket_mybatis_guice;

import java.text.SimpleDateFormat;

import javax.servlet.http.HttpServletRequest;

import org.apache.wicket.markup.html.WebPage;
import org.apache.wicket.markup.html.basic.Label;
import org.apache.wicket.request.cycle.RequestCycle;
import org.apache.wicket.request.http.WebRequest;

import com.google.inject.Inject;
import com.tsukaby.wicket_mybatis_guice.bean.Access;

public class TopPage extends WebPage {
  private static final long serialVersionUID = 1L;

  @Inject
  private AccessService svc;

  public TopPage() {

    WebRequest req = (WebRequest) RequestCycle.get().getRequest();
    HttpServletRequest httpReq = (HttpServletRequest) req.getContainerRequest();
    String ip = httpReq.getRemoteHost();

    // 現在のIP表示
    add(new Label("ip", ip));

    // 前にアクセスした日付取得
    Access access = svc.readAccess(ip);
    if (access != null && access.getAccessTime() != null) {
      SimpleDateFormat sdf = new SimpleDateFormat("yyyy/MM/dd HH:mm:ss");
      add(new Label("access", sdf.format(access.getAccessTime())));
    } else {
      add(new Label("access", "Nothing"));
    }

    // アクセスした日時を記録
    svc.writeAccess(ip);
  }
}
以上で完了。
コンストラクタ内だからsvcはまだInjectされてないのでは?使えないのでは?と思うけど、そこはwicket-guice連携のおかげなのか何とかなっている。理由までは不明です。
後、冒頭に挙げた参照先ではweb.xmlを変更してGuiceFilterとかを追加していますが、今回はそれをやらないでもInjectは成功しました。本当に必要な設定なのかはまた今度調べたい。
実際にアクセスしてみると以下のようになります。
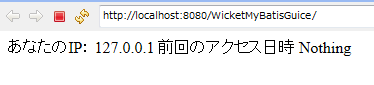

IPがv6形式で表示されてしまう場合は、ぐぐれば分かりますがVM引数に「-Djava.net.preferIPv4Stack=true」を指定すればIPv4形式になります。
完成したアプリは以下に配置してみました。誰かの参考になれば幸いです。